
Have you been tinkering around with the idea of starting a food blog, but have no clue where to even begin? I get it. There are at least a million questions that go along with how to start a food blog, or any blog for that matter.
What should I name it? Which blogging platform do I use? How do I build an audience? Will I have enough content to share? What do you mean there is a syntax error in my internal server?—I don't speak code! Is anyone going to read this besides my mom? (Love you, Mom!)
These are all very real, and somewhat terrifying questions, especially if you have zero experience with blogging. But! That doesn't mean you can't start an awesome blog. With five years of blogging and social media marketing experience under my belt, I am going to tell you everything you need to know to make it a success.
1. Pick a niche and come up with a memorable name. Pinpoint the topic you are passionate about and want to share with the world! Are you a seasoned traveler with beautiful photography to share? Start a travel blog! You love to cook and share recipes? A food blog is the right choice. Are you the ultimate crafter and find yourself DIYing everything under the sun. You should nail down a solid DIY and crafting blog. Want to share multiple facets and interest? Start a lifestyle blog with a focus on three to four specific topics (parenting, style, food, fitness, etc.)
Now you need a name. Pick something that is catchy, but not overdone. Your name is also a great option if you can't decide on anything else. Make sure it is readable and flows well when you write it out as a domain name, too! (Full of Sass, I'm looking at you.) Now, make sure that domain name is available, along with all of the social media platforms. You want to streamline everything so it has the same name, down to the punctuation. This creates a seamless brand and makes marketing and sharing much easier.
2. Sign up for all of your social media platforms. Make a profile on Instagram, Facebook, Twitter, Pinterest, Snapchat, and Periscope. I would start with those six (I know, it seems like a lot!) even if you don't plan on being extremely active on all. It's just good to have them if you decide to use them later on. Also, if you are an active Google+ user and you plan on making videos, be sure to sign up for Google+ and YouTube as well.
3. Use WordPress to self-host your blog. As a user of Blogger and WordPress, I can give you my honest opinion about which is better. The verdict? WordPress! By a landslide. It's easier, looks professional, has the ability to perform more functions, and it's self-hosted so you have greater control of how you want it to work and look. I know, this sounds incredibly intimidating, but I am going to walk you through the steps to set up your self-hosted blog! You ready? Here we go:
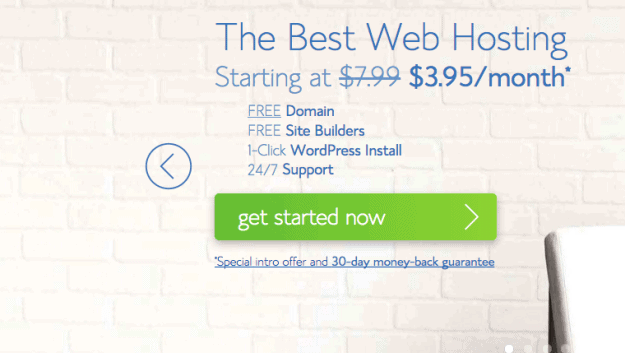
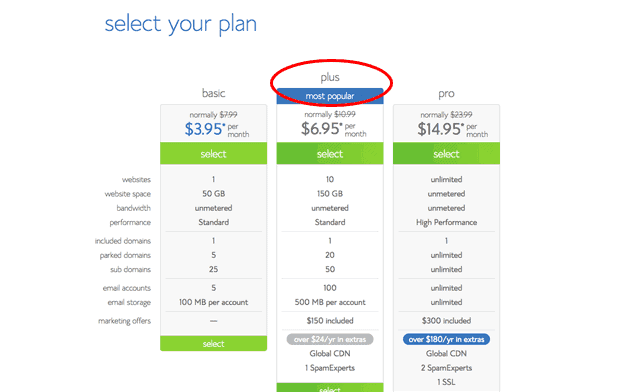
Set up your hosting account. This is the living center for your blog. I use Bluehost, which is the cheapest and easiest service available. The support staff is great, and it is very user-friendly. Also, this is the hosting service WordPress recommends, and when WordPress tells you to do something, you just do it! 😉 Go to the Bluehost home page here, and click "Get Started Now" button. Select the Plus Plan. It's worth the few extra pennies, trust me.
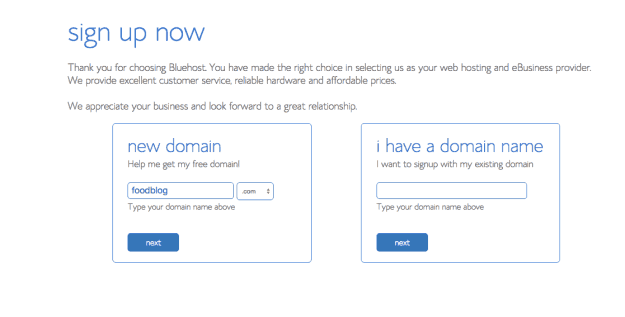
Next, enter your decided domain name in the left-hand box. Select the extension you want (.com, .org, etc) and click the "Next" button.
Fill in your information and scroll down to select your package. You can select the length of contract you want for your blog, whether it's 12, 24, or 36 months. I selected two years, and note that it is cheaper the longer your commitment. Also keep in mind that they charge you for your entire annual contract up front, not monthly. Don't let this scare you off! It's worth the investment and any expenses you have for your blog can be written off if your blog is intended to be a business and source of income. Also, disregard all of the other services they offer—you can buy those later if you decide you need them.
Enter your billing info and accept the Terms of Service. Click the "Next" button. It will ask for other upgrades and add-ons again. Just skip these too—again, you can add them on later if needed! Now, click the "Complete" button at the bottom of the page and wait for it to load.
The "Welcome to Bluehost" screen will appear congratulating you for making the best decision you've ever made, and now it's time to pick a password! Click the "create a password" button. You can make your own or have them generate a super password that is nearly impenetrable. Write this down!
Select the box for reading and agreeing to the terms of service and click the "Create" button. You now have a Bluehost account! Hooray!
You will now come to the Bluehost login screen. Enter your domain name if it is not already auto-filled and enter your password you wrote down. Click on the "Submit" button.
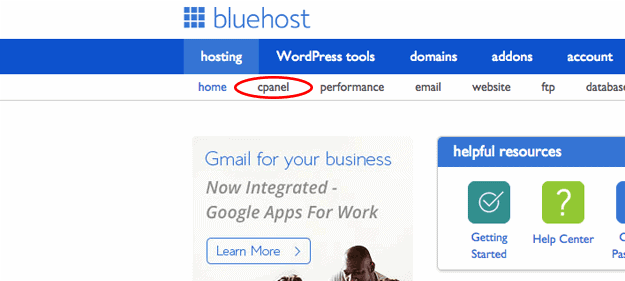
Click on the "Hosting" button in the upper left-hand corner, where you will be taken to your Control Panel (also know as cPanel). Close out of any pop-up screens offering you a walk-through of the site.
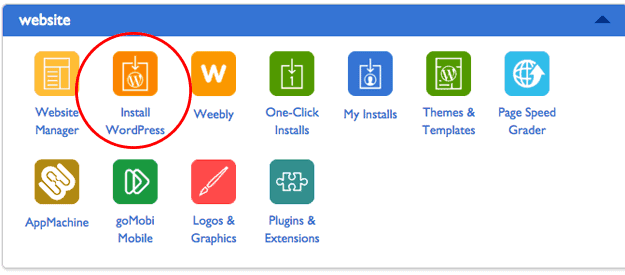
Scroll down the page to the "Website" area, and click on "Install WordPress" logo. You may need to wait a minute or two for it to load. A new WordPress screen will appear where you will click on the "Install" button. It will take you to a new screen where you select the domain you want it to direct to. It should automatically fill in with the one you just registered. Click on "Check Domain." On the next screen, click on "Advanced Options" and type in the name or title of your blog. Accept the "Admin Username" and "Admin Password" it assigns to you.
Click the item stating you have read the Terms of Agreement and click the "Install Now" button. Wait a couple of minutes for this to process.
Once the install is complete, click the "View Credentials" button. This will take you to your Notification Center and you will click on the "View" button. This will give your your blog URL, login URL, username and password. Write this down and keep it somewhere visible, even though they will email it to you.
Click on the "Admin URL" link, where it will take you to the WordPress login page. Enter the username and password you just wrote down, and click the "Log In" button. You will now be at your WordPress Dashboard where all the magic happens! Here is a basic tutorial on how to make your first post.
I would now suggest buying a premium theme. I use Station Seven and love their designs. They are clean and minimal, so take a look! You can also find other premium themes here. This is the route to go if you don't want to shell out thousands of dollars for a custom web design.
4. Create an editorial calendar and blog schedule. Figure out how many days a week you can realistically post, and then plan everything out by keeping to an editorial calendar. It helps if you buy a planner or calendar specifically for your blog posts. Schedule out at least one week in advance and jot down every possible idea you have in your planner. Don't know what to post about? This is a great chart to help you brainstorm about interesting topics.
This is an extremely handy chart for blog stats, which includes best post times, days, and frequency. Based on my own personal experience from blogging on my lifestyle blog, and reading hundreds of articles about it over the years, you want to post at least three times per week. And try to do it at the same time everyday so your readers know what to expect. This will give you a solid consistency and help you continuously grow your audience. Obviously, the more you post, the more traffic you will get—IF you have great content. Which leads me to my next point...
5. Write and create GREAT content. Make sure you have something useful to say or show! Give people information they want or need, or didn't know they need. Make it interesting. Use catchy titles that lure the reader in. You sharing tips about fitness? Instead of a titling your post, "My Fitness Tips" opt for something like, "7 Fitness Tips That Will Tone and Tighten Your Body." Be descriptive, and try not to write in vague cliches. (Basic rules of writing, folks.) Also, tell stories! People love a well-written, entertaining account of an incident or chapter of your life. It makes you real and relatable.
This might be my number one tip, even though I am listing it as tip number five: TAKE GREAT PHOTOS. Ideally, you should invest in a DSLR if you are serious about your blogging and want to turn it into a business. Professional is as professional does! I shoot with a Nikon D40, which is an old school body, but that just shows you don't need an exceptionally fancy camera to get great results and stunning photos. Invest in great lenses, instead. I shoot primarily with the Nikon AF-S DX NIKKOR 35mm f/1.8G and Nikon AF-S FX NIKKOR 50mm f/1.8G lenses. Learn how to shoot on manual and even consider buying Photoshop. I use Adobe Creative Cloud and pay $9.99 a month for the service, which allows me to use A Beautiful Mess Actions, the filters I use to edit all of my blog photos.
Don't have the cashflow to buy a fancy camera yet? Don't fret! Your iPhone or Android can give you amazing shots as well. The key is learning how to style, compose, and edit your photos. Read all about my process and workflow for taking and editing amazing photos on your phone here. Also, I am in the midst of working on my ebook guide for beautiful food styling, so stay tuned for that little diddy!
6. Get social! You've worked really hard in building a gorgeous blog, and you are sharing great content, but where is the traffic? Your social media platforms are here to help you with that. Promote your work consistently on at least three social channels. My main sources of traffic come from Instagram, Pinterest, and Facebook, and I am becoming more involved with Periscope. You can be active on more than that, but I think it's best to find the channel where your audience mostly hangs out and focus on growing that platform. I would suggest Instagram, since it is highly visual and is practically a mini blog itself. The opportunity to gain new followers there is ripe and you can connect with them through conversation.
And please, for the love, BE SOCIAL on your social media. By that I mean you need to respond to all comments and leave genuine, engaging comments to people you follow. If you like something you've seen, share it! That's how traffic and SEO is built, and it is most definitely a two-way street.
Reach out to other bloggers who share your niche and aesthetic, and ask to guest post. Apply to contributor platforms like Domino and POPSUGAR (my two favorites) who will syndicate your posts and share them with their wide audience. DO NOT BE AFRAID OF REJECTION. The worst thing someone can say is no, or simply not reply at all. Follow up once; if you don't hear back, move on and don't let it hurt your feelings. There are hundreds and thousands of other blogging relationships to be made on the great world wide web!
7. Be patient. If you build it, they will come. Even Kevin Costner says so. Follow these guidelines and I promise you will have success, although don't expect it to happen immediately. It takes a solid year or two to get to a point where you are feeling confident about your blog and seeing its potential. Set small monthly goals for yourself, and don't obsess over your numbers or followers. I recommend taking a monthly inventory to track your progress. This way you won't drive yourself bonkers with counting every single gain and loss, and you will see an overall positive growth, which will be the best for your mental state. (Trust me, I've learned from experience.)
Good luck on your blogging adventures, and please leave any questions or thoughts you have in the comments!
Paulin Curlay says
I love you website! And this post is so helpful as I am trying to start my own food blog. It gave me a lot to think about and provided a lot of guidance!
I do have one question, is there any plugin or website that I should go to in order to add the copy right sign or information to my blog? I’m currently using wordpress.com
The Butter Half says
You're very welcome! Glad you found it helpful.
My copyright info at the bottom was already included in the template I purchased, which covers all of my blog posts, but I am sure there is a plugin. Just search for it in your Dashboard. 🙂
Tim Martine says
Love this post! I have one question that I’m hoping you can answer. Should I use wordpress.com or wordpress.org? I’m kinda confused about the difference and reading articles online hasn’t helped me much. It seems like wordpress.org is better if you are hoping your blog becomes well known and successful. I’d love to know what you recommend! Thanks!
The Butter Half says
Use wordpress.org! You will have many more options and control over your website. That way you don't have to deal with the stress of switching over if your blog becomes successful. 🙂
Hannah says
I'm slowly but surely being convinced I need to buy a domain and make the switch to Wordpress! This post was incredibly helpful! My question is, what part about the "plus" option on bluehost makes it worth the extra money?
The Butter Half says
Wordpress and hosting your own domain is the only way to go if you want to take your blog to the next level and make it look more professional. I was nervous to switch to Wordpress because I only knew Blogger, but it's actually SO much easier. I opted for the Plus plan simply because it includes more website storage, but you can totally do the cheapest one! That will work great too. Let me know if you have any other questions and best of luck to you on your blogging adventure! xo
Spokaneeats says
Awesome post!
Thanks for sharing 🙂
The Butter Half says
Thanks for reading! 🙂